SOME SIMPLE ASANAS TO KEEP YOU FIT
Dwikonasana - Double Angle pose

The starting position-Stand straight with the feet shoulder width apart. Extend arms behind the back and interlock your fingers. Bend forward from the hips while simultaneously raising the arms behind the back as high as possible without strain. Use your arms as level and accenturate the stretch given to the shoulders and chest muscles. Look forward as far as possible ,so that the face is parallel with the floor. Remain in the final position for 10 seconds and return to the upright position. Breathing: Inhale while stadining erect and when returning to the upright position.exhale as you bend forward.
Benefits:
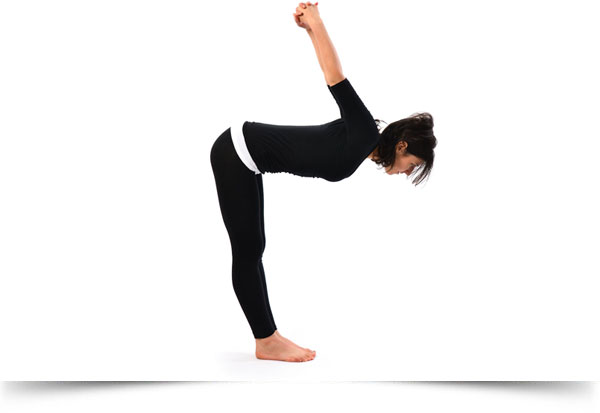
Bend forward from the hips while simultaneously raising the arms behind the back as high as possible without strain. Use your arms as level and accenturate the stretch given to the shoulders and chest muscles. Look forward as far as possible ,so that the face is parallel with the floor. Remain in the final position for 10 seconds and return to the upright position. Breathing: Inhale while stadining erect and when returning to the upright position.exhale as you bend forward.
The benefits of this pose are
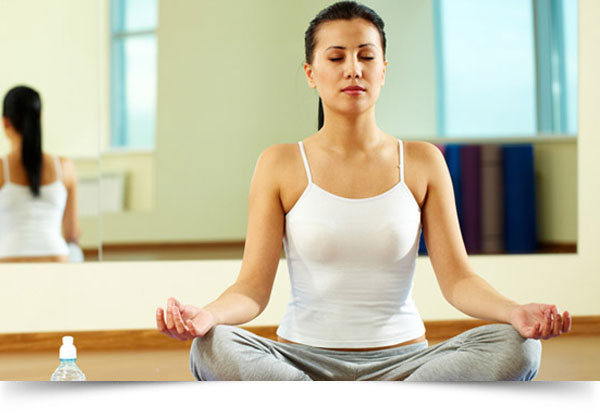
SIDDHASANA OR MUKTASANA - THE PERFECT POSE
Sit in Dandasana then, spread your legs slightly. Bend the left knee and slide the left heel into the groin. Then release the left knee onto the floor, rotating from the hip joint. Ideally sitting the heel into the area between the genitals and the anus. So that the heel touches the perineum.
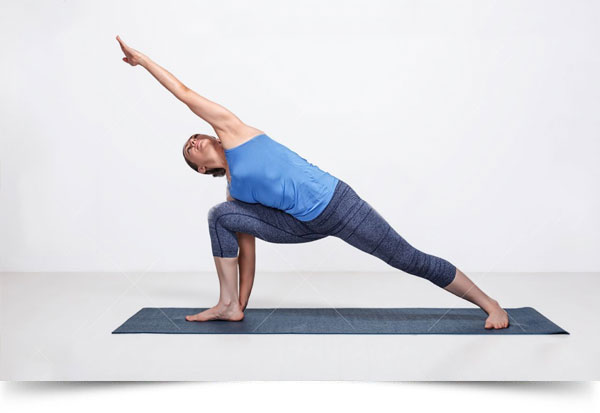
PARIVRITTA PARSVAKONASANA - REVOLVED SIDE ANGLE
The combination of stretching and twisting in this Asana makes the spinal column straighter and freer. It also mobilizes parts of the back and the hip, which in daily life do not move a lot. The twisting motion trains the nerves and the sinews in the spinal column and improves digestion.
- Step 1: To start off, put your right foot forward, bend your knee at 90 degrees, and kneel with your left knee
- Step 2: Bring your left elbow or left upper arm over your right knee. Move your right hand close to your hips.
- Step 3: Place both palms in the prayer position. Make an upward motion out of the lower back so that the elbow slightly presses upward against your right knee and you no longer lean on your leg
- Step 4: Put some counter pressure with your arm against the knee, stretch your back, move your shoulder blades backwards, and turn to the right with your upper body. Straighten your left leg backwards
You can take steps 3, 4, and 5 as separate exercises. For beginners or for warming up, steps 1 to 3 are good enough. A more advanced variation is step 4 where you can also lift your other knee without changing the position of your lower back, hip, and upper leg. As a result, you will stand on both legs. It is better to perform steps 3 and 4 properly than to rush into step 5 with less concentration and relaxation. Steps 1 to 4 are also great warm-up poses for step 5.
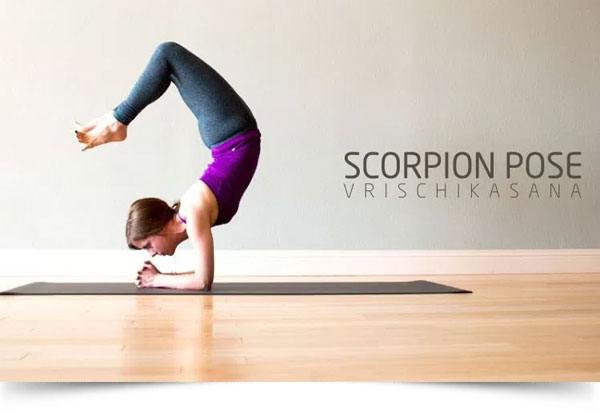
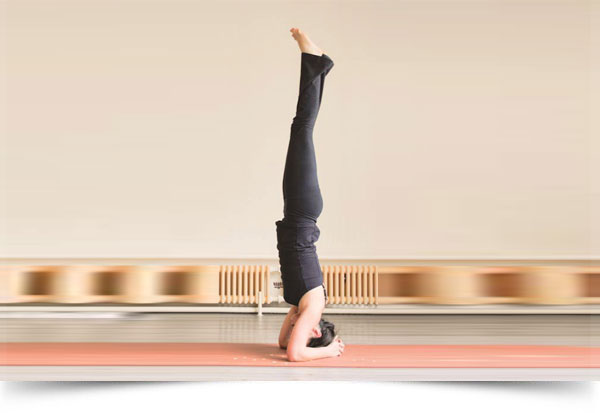
VRISCHIKASANA - THE SCORPION
Start the pose in Balasana (Child's Pose). Next, fold your arms and place them in front of your head, around shoulder-width apart.
In the beginning it is better to do this pose against a wall. Position yourself in such a way that your head is around 2 – 3 feet away from the wall; so, you can use the wall for support, in case you lose your balance.
Next rise up into Sirshasana (The Headstand) then lift your head from off the floor and raise it as high as you can.
With a deep inhalation swing your legs up, above and behind your head carefully maintaining your balance.
Take your legs all the way behind your head, flat feet pointing to the wall. Now, bend your knees and, slowly, drop your feet towards your head. Take care not to do this too fast or drop your legs too far. Always maintain your balance.
This pose will call for some strength, so don't hold it for too long, not more than 15 – 30 seconds. Gradually, increase the length of time, as you gain more confidence with the pose.
To come out of the pose gracefully take your legs back to an upright position, vertical to the floor, without falling out of the pose, and drop your head, gently to your mat, back into Sirshasana (The Headstand).
Slowly come down, knees folded and relax in Balasana (Child's Pose) for half a minute or so.
Benefits:
Contraindications
People suffering from detached retina, glaucoma, or any other eye conditions should avoid the pose as the pressure it creates will only aggravate the condition. Those suffering from High Blood Pressure or Heart Palpitations had also best avoid this pose. Also avoid the pose in case you are suffering from vertigo..
Caution:
Attempt the Scorpion pose only when you are able to do Sirshasana (The Headstand) without any difficulty. Beginners shouldn't event attempt this pose. Always make sure to check with your doctor if it is okay for you to do this pose.
SHIRSHASANA - HEAD STAND
Headstand Shirsasana is one of the most important asanas in yoga, being named " The King of Asanas".It revitalizes the entire body and stimulates the mind.
METHOD:
- Step 1: Sit in a kneeling position with the buttocks resting on the heels of the feet.
- Step 2: Lean forward and place the forearms on the floor in front while keeping the elbows about shoulder distance apart. Interlock the fingers of both hands.
- Step 3: Place the top of the head flat on the floor ( where the hair line begins ) with the back of the head pressed against the inside of the interlocked fingers.
- Step 4: Placing the tips of the toes firmly on the floor while lifting the heels, raise the knees off the floor.
- Step 5: Hold for the duration of 2-3 minutes for beginners, increasing by 2 minutes every week thereafter. Breath, calm, softly only by nostrils.
- Step 6: Slide the legs out straight returning to the no.1 position, keeping your head down on the ground for about 1-2 minutes, breathing calm ( inhale by nostrils, exhale by mouth, keep your eyes closed, focus your relaxed attention on the energies you feel into your head especially Shahashrara
- Step 7: Shavasana posture, doing the relaxation for about 3-4 minutes, with closed eyes, continuing to breath calm, softly.
Headstand ensures a proper blood supply and stimulates the pituitary and pineal glands in the brain, glands that are responsible for growth and sex hormones. Our growth, health and vitality depend on the proper functioning of these two glands that control the chemical balance of the body.
Regular practice of shirsasana makes healthy pure blood flow through the brain cells. This rejuvenates them so that thinking power increases and thoughts become clearer. Headstand stimulates the nervous system, increasing mental alertness and clarity. It is a centering, calming and soothing pose. People suffering from loss of sleep, memory and vitality have recovered by the regular practice of this asana.
Headstand strengthens the spine, neck, shoulders and arms. The muscular system of the abdomen and legs are toned. Blood and lymph fluid is relieved from the legs and ankles and with regular practice prevents the buildup of fluid in the legs and feet. Coupled with shoulder stand it is a benefit to people suffering from constipation. The lung tissue is stimulated, which relieves colds, coughs, tonsillitis, bad breath and palpitations.
By reversing the pull of gravity on the organs, especially the intestines, it helps to cleanse them and overcome problems of the liver, kidneys, stomach, intestines and reproductive system. Headstand increases gastric fire and produces heat in the body. When done properly, headstand helps the spine become properly aligned, improving posture, facilitating good breathing and reducing muscular stress. The weight of the abdominal organs on the diaphragm encourages deep breathing, which gently massages the internal organs. Shirsasana is used to treat asthma, hay fever, diabetes, headaches, anxiety and menopausal imbalance.
People suffering from high blood pressure, detached retina, glaucoma, hernias, cardiovascular disease, cervical spondylitis, thrombosis, arteriosclerosis, and kidney problems should not practice headstand. Those suffering from neck injuries should seek advice from an experienced yoga teacher before beginning to practice headstand. It is advisable for women during menstruation to avoid inversions. Also, do not practice this asna before to learn the correct practice from and qualified yoga teacher.
Time spent doing everyday sarvangasana and sirsasana, is one of the best things you could possibly do for yourself. These poses bring health and vitality to the body while calming and soothing the mind and spirit.
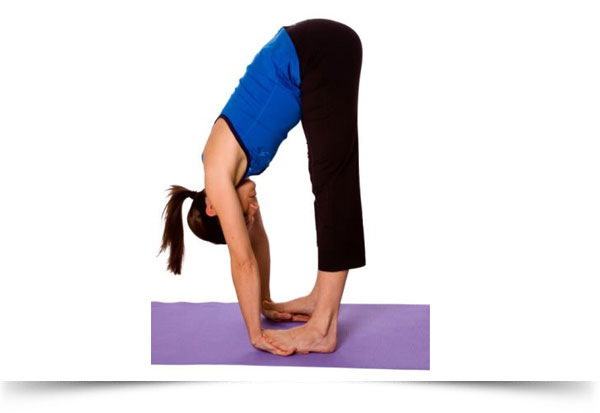
PADAHASTASANA - FORWARD BEND
Breathe normally as you stand with feet solidly on the ground. Allow all muscles to relax. Close your eyes. Be aware of your body. Inhale, then exhale while you slowly bend forward. Lean forward until you can touch your knees, calves, ankles, or feet. Do the movement slowly and in a relaxed manner. From the start to the final position, the movement should be slow, fluid, continuous, and mindful. Do not force the stretch. Remain bent over for approximately five seconds, or as long as feels comfortable.
- Step 1: Do not bounce up and down. Allow yourself to bend over farther after your breath has helped your back muscles to stretch out. You may feel some trembling in your body. Allow that trembling to happen. Practice with full awareness and concentration, moment to moment.
- Step 2: Be aware of the sensations and the feelings the posture develops in different parts of your body, especially in the areas of your back and legs. Feel the movement of your belly.
- Step 3: Concentrate on a focal point of this posture. This can be your hamstring muscle, muscles of your back, the first chakra, relaxation aspect of your muscle, or a spiritual aspect such as visualizing humility. Just relax into the posture. Be aware of your feelings and sensations.
- Step 4: Inhale and Return to an upright position by bending your knees slightly and stacking your vertebrae up one at a time. Let your head be the last part of your body to come back into position. Be aware of and feel the changes in your position and in your spine as you slowly straighten to an erect position. Be aware of the sensations in your body and muscles. Relax.
- Step 5: Repeat two to four times, or if you are allready comfortable in this posture, practice continously for 2-3 minutes.
Benefits:
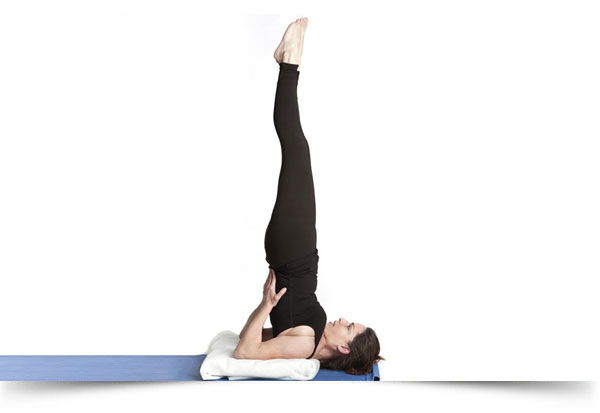
SARVANGASANA - SHOULDER STAND
- Step 1: Lie on your back, your hands beside your thighs and your plams resting on the ground.
- Step 2: Stretch your body and keep it taut.
- Step 3: Inhale and raise your legs slowly, placing pressure on your hands.
- Step 4: When your legs are at 90 degrees to the ground, hold for a few seconds. Then raise your waist too, supporting it with your hands.
- Step 5: Place your palms on your back, your elbows resting on the ground and hands suoirting the back, as you raise your legs as high as you can. In this position try to touch your chin to your chest.
- Step 6: Keep your toes together and strengthen your entire body. Breathe normally.
- Step 7: Hold the posture for as long as you can and then return to base position in a single, smooth motion. Rest for 4-5 minutes in shavasana.
Benefits of Sarvangasana Yoga:
Caution:
If you suffer from backache, slip disc, cervical spondylosis, high blood pressure or any heart ailment, then practice sarvangasama and matsyasana very gently. Try to avoid and jerky movements.
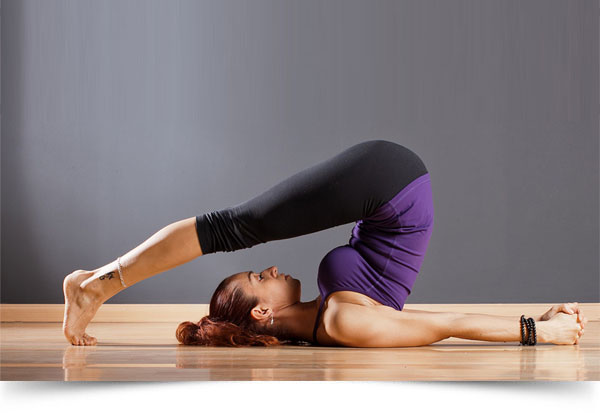
HALASANA - THE PLOUGH POSTURE
Halasana is also called the Plough pose because when you reach to the final position of this pose your body resembles the shape of Hala the Indian ploug.
Performing Halasana:
Start with lying on your back with knees bent, the soles of the feet on the ground and with legs held together. Place hands on your hips or waist, with your thumbs pointing for ward on the waist and palms and fingers underneath the back supporting it. On an exhalation, swing your knees and thighs over you abdomen. Raising your hips and torso, and support this position with your hands on your lower back. Now straighten your legs so that they are parallel to the floor. Then press your elbows into the floor to help you move your hips over your shoulders and bring your chest in toward your chin; feet are relaxed. Hold this position. If you are comfortable in the pose, try to touch your toes to the floor while keeping your legs extended. Then, if you can, extend your arms palms down on the floor behind you; or clasp your hands, pinching you shoulder blades together to help you do so. This is the extreme position and should be practiced gradually and under the observation of learned trainer.
Benefits of practicing Halasana
Cautions
Do not practice this asana when you have diarrhea or back and neck injury. Women should not do this pose during Menstruation and after they become pregnant. Avoid jerks or speedy movements while doing this asana as it might cause some injury to the backbone. People with asthma & high blood pressure problems should practice this pose with the legs supported on props.
Hold in this position for a few seconds in the beginning, increasing till 2-3 minutes gradually
slowly come back to the Shavasana position and concentrate to feel the energy in Ajna and Vishuddha chakras.
LYING DOWN SPINAL TORSION
THE STARTING POSITION
Lie down on the floor with your head towards the magnetic north. Put your lumbar area as close to the floor as possible.
The hands should be away from the body, the palms should face upwards; the legs are apart from each other.
THE FIRST STAGE
Bend the left leg, placing the left sole on the right leg lying on the floor. Place the right hand on the left knee. The head remains straight.
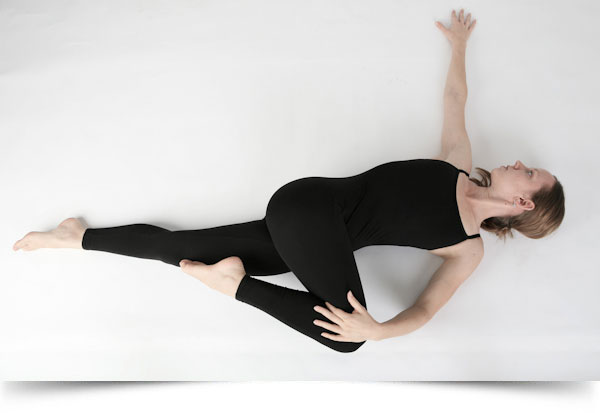
THE FINAL POSE
Exhale completely with a slight contraction of the abdomen. Push the left knee to the right pressing it to the floor with the help of your right hand, thus twisting the trunk to the right.
In this way you make a maximum contortion of the lumbar vertebrae. The left knee has to remain unmoved on the floor during the exercise. Now place the left hand on the floor perpendicularly to the trunk the palm facing downwards.
Spin your head to the left looking straight to the finger tips of your left hand. Keep the shoulders stuck to the floor during the whole exercise.
Relax as much as possible the base of the spine while executing the posture. Remain in this position with your eyes closed, breathing calmly and deeply.
Notice the free flow of the energies through the backbone, an overall relaxing and energizing state. When coming back the intermediary stage is not required. Stretch the bent leg and put the hands near the body and relax.
FOCUS
Concentrate to perceive the activation of Manipura Chakra in its receptive, sensitive aspect and notice the awakening of will, self confidence, optimism, enthusiasm.
THE RIGHT SIDE
THE STARTING POSITION
Lie down on the floor with the head towards the magnetic north. Get the lumbar area as closet to the floor as possible. The hands are slightly remote to the body, with the palms facing upwards; the legs are apart from each other.
THE FIRST STAGE
Bend the right leg, placing the righ sole on the left leg lying on the floor. Place the left hand on the right knee. The head is still straight.
THE FINAL POSE
Exhale completely, slightly contracting the abdomen. Push the left knee to the left, pressing it to the floor with the help of the left hand, twisting the trunk to the left.
Thus, you make a maximum contortion of the lumbar vertebrae. The right knee must remain unmoved on the floor during the entire exercise. Then place the right hand on the floor, perpendicularly to the trunk, with the falm facing downwards.
Spin the head to the right, looking straight to the finger tips of your right hand. Keep the shoulders stuck to the floor during the whole exercise.
Relax the inferior part of the spine as much as possible while performing the posture. Remain in this posture with your eyes closed, breathing calmly and deeply.
Feel the free flow of energies through the spine, a global relaxing and energizing state. Come back without neccessarily passing through the intermediary state. Stretch the bent leg, put your hands near your body and relax.
BENEFICIAL EFFECTS
